
The Ultimate Azure Architecture Blueprint
Every great cloud project starts with a clear plan. Designing in Microsoft Azure is not about connecting random services, but about building a structure that is secure, scalable, and easy to manage. Architecture is the bridge between ideas and real impact in the cloud.
Good architecture doesn’t just look nice in a diagram. It’s what makes your system work under pressure.
Over time I’ve built many environments using the Azure Architecture Center, Well-Architected Framework, and Visio to bring designs to life. In this article I’ll walk you through the same process I use with customers and students - how to plan, visualize, and build a complete Azure environment the right way.

Table of Contents
- Start with the Foundation
- Apply the Well-Architected Framework
- Visualize with Visio or Draw.io
- Turn Diagrams into Infrastructure as Code
- A Real Architecture Example
- Best Practices That Matter
- Final Thoughts
1. Start with the Foundation
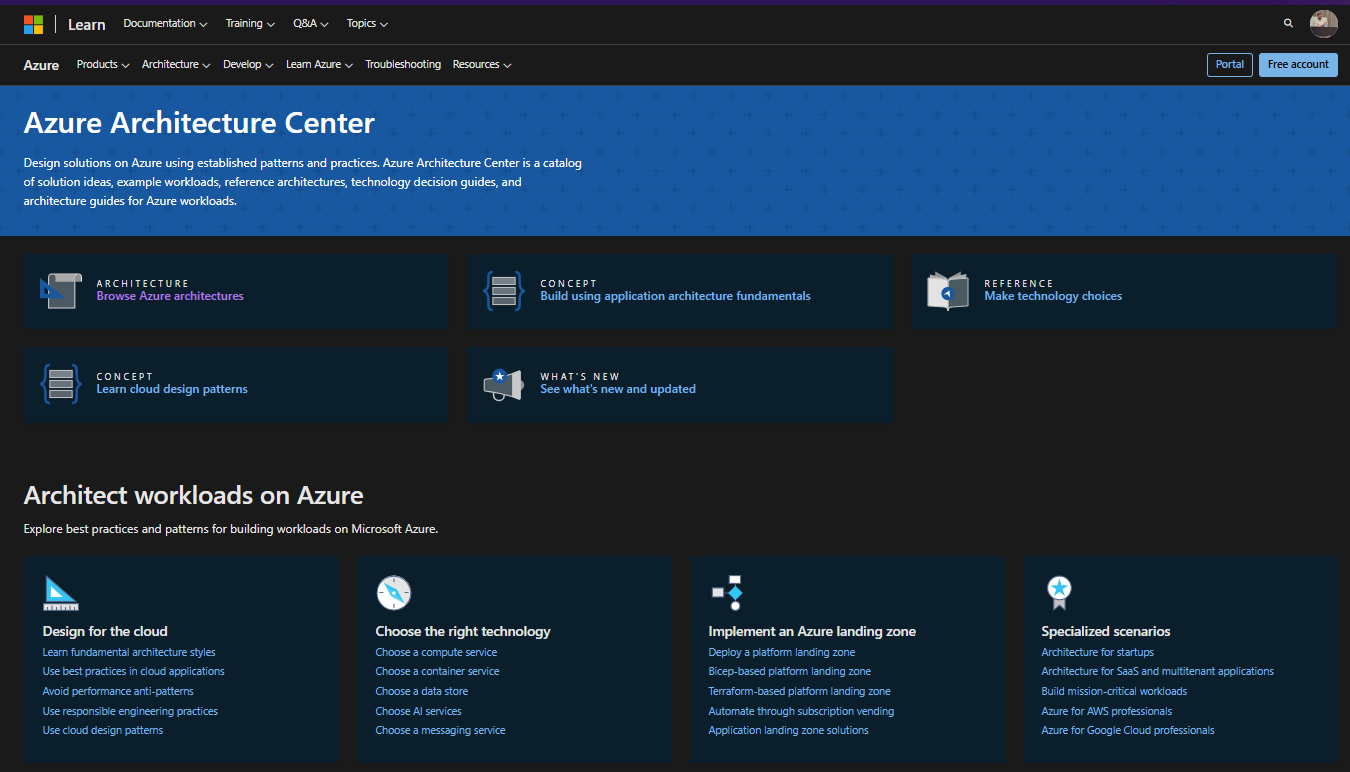
Never start from scratch – Azure already gives you a strong base to build on. One of the most powerful yet underrated tools for architects is the Azure Architecture Center. It contains hundreds of proven designs, reference architectures, and deployment blueprints that reflect years of best practices collected by Microsoft’s product teams and field engineers.
Instead of opening Visio and starting with a blank canvas, browse through existing reference architectures that match your scenario — web applications, data analytics, hybrid environments, or AI workloads. Each reference model includes not only a visual diagram but also a downloadable Visio file (.vsdx). You can extract that file, open it locally, and use it as your foundation to modify, adapt, and evolve into your own design.
This approach saves time, ensures you follow Azure’s standards, and gives you a professional visual baseline built on the Well-Architected Framework principles — security, cost, reliability, performance, and operations. You can replace components, adjust networking, and add layers like monitoring or automation while keeping the original Microsoft structure intact.
Start by defining:
- A clear landing zone with management groups, policies, and network layout
- Identity layer integrated with Microsoft Entra ID and managed identities
- Governance and cost control through tagging, budgets, and Azure Policy
- Security and observability from day one — Defender for Cloud, Log Analytics, and alerts
By starting with an existing architecture from the Azure portal and iterating on it, you build faster and smarter. You’re not guessing — you’re standing on best practices that have already been tested in the real world.
2. Apply the Well-Architected Framework
Once you have a solid foundation, it’s time to test your design against the core principles that define every strong cloud architecture. Microsoft’s Azure Well-Architected Framework provides a structured way to evaluate and improve your Azure environment.
The framework is built on five key pillars that serve as your north star during the design phase:
- Reliability – design for redundancy, self-healing, and quick recovery
- Security – protect data, enforce least privilege, and isolate networks properly
- Cost Optimization – use auto-scaling, right-size your resources, and monitor spending
- Operational Excellence – monitor everything, automate repetitive tasks, and document your processes
- Performance Efficiency – ensure your system can scale dynamically and leverage caching and CDN effectively
I personally use these pillars as a decision checklist in every architecture I build. From choosing the right database tier to defining subnet sizes and security boundaries — every design decision must align with at least one of these pillars. It keeps the architecture clean, consistent, and easy to defend when presenting to technical and business stakeholders.
💡 Read more: To dive deeper into how these principles connect with Microsoft’s Cloud Adoption Framework (CAF), check out my full article here: 👉 The Azure Well-Architected Framework Explained – Captain Azure Edition
Remember – the goal is not perfection. The goal is measurable improvement. Every architecture you build should become more secure, more cost-efficient, and easier to operate than the one before.

3. Visualize with Visio or Draw.io
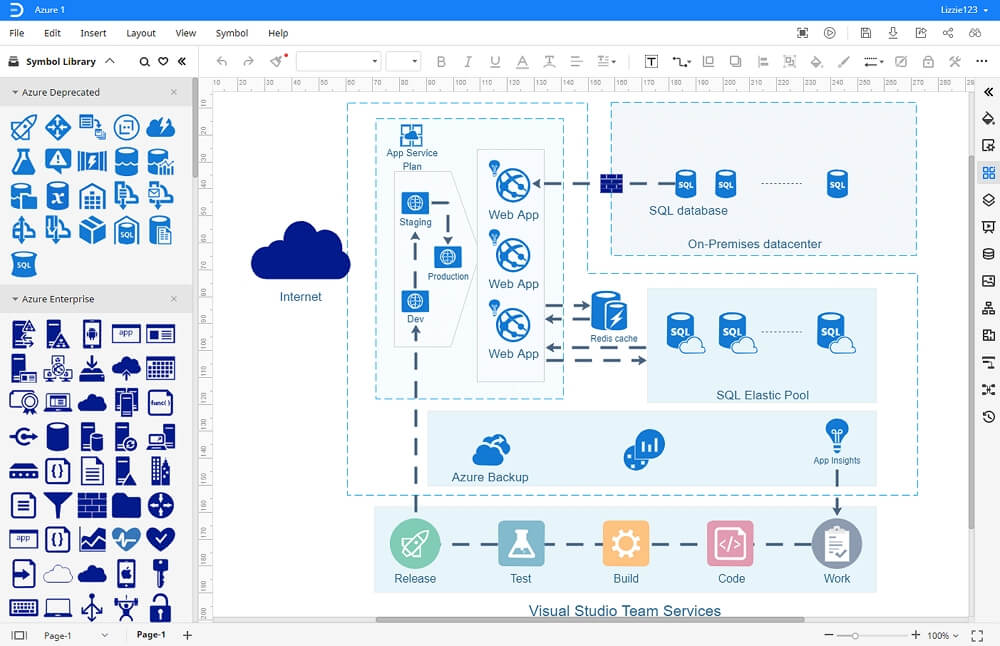
Every architecture becomes clear the moment it’s visualized. A strong diagram doesn’t just look good — it communicates your logic, your security posture, and your scalability plan at a glance. That’s why I always recommend building your design visually with Visio or Draw.io using the official Azure icons. These icons are standardized across Microsoft documentation and instantly recognizable by anyone working in Azure.
The goal is not to create art — it’s to tell a technical story. A good diagram shows how components interact, where data flows, and where your security and operational boundaries are.
When I design an architecture, I usually start by importing a Visio template from the Azure Architecture Center and then adapt it to my own workload. Each reference architecture on that site includes a downloadable .vsdx file that you can open, modify, and extend. This allows you to build your own version of a best-practice design — whether it’s a microservices app, data pipeline, or hybrid deployment.
Your diagram should include at least the following layers:
- Traffic Flow – clearly show the path from users through Front Door or Application Gateway, into the backend and database
- Security Zones – mark VNets, subnets, NSGs, Private Endpoints, and where isolation occurs
- Connectivity – represent links between layers (for example, API calls, service bus queues, or SQL connections)
- Resiliency and Scale – use visual cues like duplicated icons or arrows to indicate redundancy and autoscaling
- Management & Monitoring – include tools like Log Analytics, Defender for Cloud, or Key Vault to show governance and visibility
A professional-looking diagram helps you in multiple ways:
- It communicates your architecture to both technical and business stakeholders quickly
- It serves as documentation for the implementation and review process
- It keeps your design consistent with Azure’s Well-Architected Framework and CAF principles
“If you can’t explain your architecture in one diagram, you don’t fully understand it yet.”
Whether you use Visio, Draw.io, or even Figma, consistency matters — use the official Azure icon set, align components properly, and color-code each layer (network, compute, data, security, management). A clean, standardized visualization shows professionalism and demonstrates that your design isn’t random — it’s intentional.
4. Turn Diagrams into Infrastructure as Code
Once your architecture is finalized visually, the next step is to translate it into code. A diagram is great for communication — but code is what brings it to life. This is where Infrastructure as Code (IaC) comes in. Tools like Terraform and Bicep allow you to define and deploy your entire environment in a consistent, repeatable, and version-controlled way.
I personally prefer Terraform for multi-cloud or complex deployments, and Bicep when working purely in Azure because it integrates seamlessly with the Azure Resource Manager (ARM). Both support modules, variable reuse, and parameterization — making it easy to scale from a single resource to an enterprise-level deployment.
Example snippet of provisioning an Azure Kubernetes Service (AKS) cluster using Terraform:
resource "azurerm_kubernetes_cluster" "aks" {
  name                = "app-cluster"
  location            = azurerm_resource_group.rg.location
  resource_group_name = azurerm_resource_group.rg.name

  default_node_pool {
    name       = "default"
    node_count = 2
    vm_size    = "Standard_D4s_v5"
  }

  identity {
    type = "SystemAssigned"
  }

  network_profile {
    network_plugin = "azure"
    dns_service_ip = "10.0.0.10"
    service_cidr   = "10.0.0.0/16"
  }

  tags = {
    environment = "production"
    owner       = "captain-azure"
  }
}
The power of IaC is automation. Once you’ve written this configuration, you can deploy it across multiple environments (Dev, QA, Prod) with a single command. It ensures consistency, reduces human error, and lets your infrastructure evolve through version control just like your codebase.
Combine IaC with a CI/CD pipeline (for example, GitHub Actions or Azure DevOps) to enable full automation from commit to deployment. Every architecture decision you make should end with a question: “Can I automate this?”
5. A Real Architecture Example
Let’s take one of the architectures we built together as a complete example. The goal was to design a secure, scalable, and observable Azure application using containers, managed databases, and full automation.
The environment included:
- Azure Front Door for global entry, intelligent routing, and caching to reduce latency
- Application Gateway (Front Door) for layer-7 routing, SSL termination, and security filtering
- Azure Kubernetes Service (AKS) hosting frontend and backend containers with autoscaling policies (HPA & Cluster Autoscaler)
- Azure Database for PostgreSQL Flexible Server connected via Private Link and private DNS resolution
- Azure Key Vault for secret storage with Managed Identity authentication (no hardcoded credentials)
- Azure Monitor, Log Analytics, and Application Insights for observability, alerting, and telemetry
 of aks-multi-cluster.jpg)
This design demonstrates how each Azure service has a clear purpose:
- Front Door improves performance globally and ensures redundancy
- Application Gateway (Front Door) adds security with WAF and routing logic
- AKS provides flexible compute with autoscaling for peak loads
- PostgreSQL keeps data safe and accessible privately
- Key Vault ensures that no secrets are ever stored in plain text
- Azure Monitor connects everything under one pane of glass for insights
6. Best Practices That Matter
Building a good Azure architecture is not just about connecting services — it’s about aligning every choice with best practices. These are the principles that I always apply to ensure a clean, scalable, and secure environment:
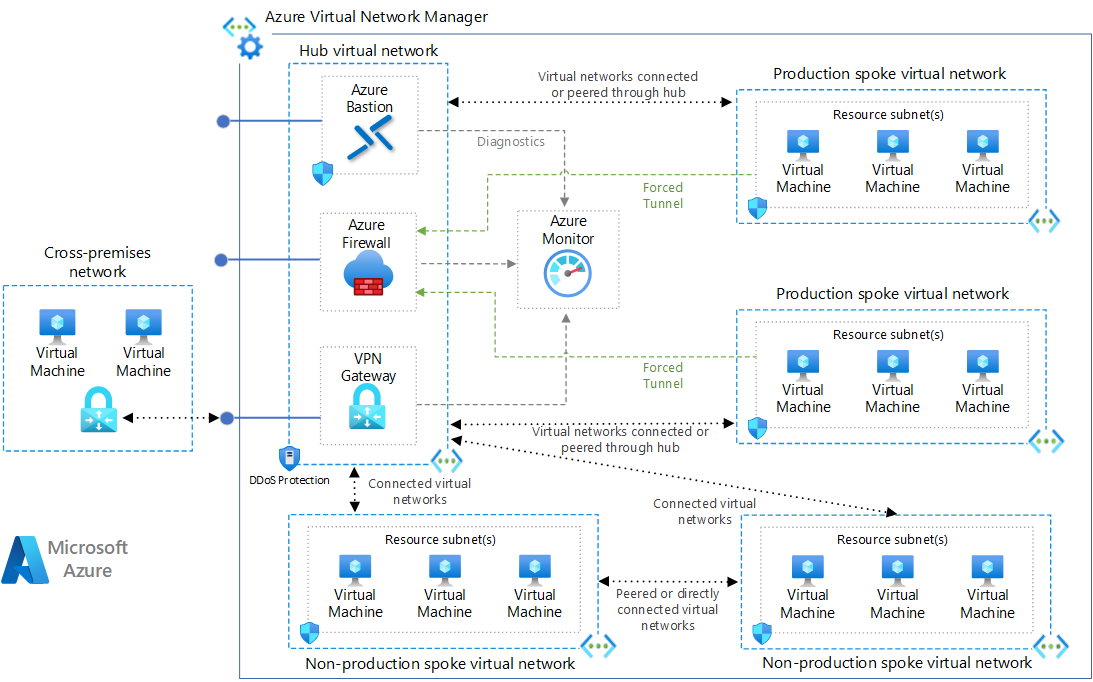
- Use Private DNS Zones with Private Endpoints for all PaaS services to keep traffic inside your virtual network
- Separate workloads into hub-and-spoke VNets to achieve isolation and simplify governance
- Enforce compliance with Azure Policy and track changes through Activity Logs
- Enable Defender for Cloud for continuous threat detection and posture management
- Design geo-redundancy early using Availability Zones and paired regions
- Automate all deployments through Terraform pipelines and maintain IaC in version control
- Integrate Azure Monitor and Application Insights from day one to catch performance issues early
Following these principles means your environment is not only operational but also compliant, secure, and ready for scale.
7. Final Thoughts
For me, building architecture in Azure is more than a technical exercise. It’s about telling a story of how each part of the cloud works together to deliver stability, security, and performance. That’s what separates a setup that survives pressure from one that collapses under it.
When you take the time to design slowly and intentionally, you start to see how every choice matters. From the smallest VNet to the Key Vault integration, every piece plays a role in the bigger picture. True architecture is not about building again and again – it’s about building once, and building it right.
Use the tools Microsoft gives you – Azure Architecture Center, IaC tools like Terraform or Bicep, and Azure Policy for governance – but remember: tools are only part of the story. What really defines your success is how you think, plan, and improve with each project you build.
I’m writing this after many architectures, lessons, and long nights spent refining diagrams. Every time I open a new Visio file, I remind myself – this architecture isn’t built just for the cloud, it’s built for the people who will manage it, grow with it, and make it better.
Written by Captain Azure ☁️⚓